WordPress Lesson 5: setting up your options (part 3)

Well, it’s still time for part 3 on your options lesson. If you need to review how to open the options, check out post number 4 in the series.

Today we’re going to have a look at Permalinks and Feeds, both of which are quite important.

Permalinks and Feeds

1. Permalinks
They are the full address in your address that you see on your blog. For example, in a standard install, a post might have the address: http://www.myblog.com/?p=71 which would lead to the right post entry number 71 in your blog. These links should be, as you’d guess, permanent.

However, this isn’t the only way you can have your address shown. In a standard install of WordPress, there are two other options: date and name based; and a programmable option:

i. Date and name based
http://www.myblog.com/2007/08/31/sample-post/

You’ll note that the blog address is followed by the Year, Month and Date. Last is the title of the post.

ii. Numeric
http://www.myblog.com/123 The numeric option might look like this, esp. if you are using a non-Roman alphabet system for your primary blog language, e.g. Chinese or Russian. This might make it easier to find individual posts.

iii. Programmable
HOWEVER, to my regret, I chose another system that hasn’t worked out well: I chose the programmable option, in which the title is determined and used as the address of each post.

For example, a post entitled ‘Good Cheese’ would render as http://www.myblog.com/good-cheese/ . This form is a good choice as it makes the URL very friendly to both users and search engines. You don’t have to remember odd numbers, and web-addresses become easy to read. It’s also difficult to tell if the page belongs to a blog or not, if you use this format.

As the name suggests, these should be permanent because it becomes very difficult to change them later. Except that it’s not difficult to change them. In fact, you might say, it’s too easy! If you do set them up, think about what URL you’d like to have BEFORE you really get into blogging. If you have any pages that use the old permalinks, and you DO decide to change, you may find that links from other blogs and websites are broken, and no longer point where they should. This will cost you visitors and PR ranking.

iv. The SLUG
The slug in WordPress is not some black, slimy thing at all. It’s the words that WP uses to create the unique URL for each post. In fact, you can see the slug on the right hand side of a post screen. Let’s open a post we wrote earlier to show you.

Step 1. Log in and go to ‘Manage’ then click on ‘Posts’.

manage posts

Step 2: Then choose the first post in your list once you scroll down one screen. Click ‘Edit’.

edit post

Step 3: Once the post opens, you will see a set of tools on the right. Post Slug is the fourth down.
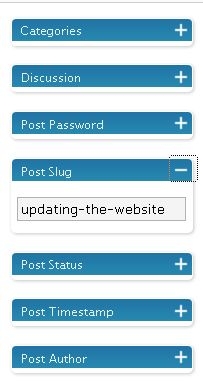
slug

Look for the words ‘Post Slug’ and click on the ‘+’. Once open, you will see some words separated by a hyphen. That’s the individual post name chosen by WP using the title of the post. You do not have to accept this choice. You can enter something else.

Please note: there are no special characters or uppercase letters in the slug. Nor is there any punctuation. You can experiment if you want to. Hit ‘save’ each time then go back to edit the post to see the changes.

Step 4. Once done, click ‘save’ or ‘publish’ and then go to the ‘Posts’ Option’ in ‘Manage’ to see what has changed. Hover over the word ‘View’ and you’ll see the address in the Status Bar. You can also publish it to see that it is the same. It is. I’ll show you.

Here’s the address bar with the title post to compare.

a. addressbar

and the post from the front page of the blog…

b. title
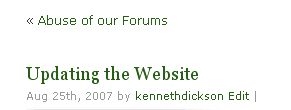
A word of advice. Do change this carefully and infrequently. I chose http://www.myblog.com/archive/postname and I hate it now. I should have chosen to delete the word ‘archive’ and just run the simplest URL I could.

Also, when you choose the basic permalink, you’ll need to follow the code outlined here (it’s called ‘Structured Tags’): to achieve what I would now llike, I should have chosen http://www.myblog.com/%postname%. Don’t forget the % before and after each command.

2. Feeding the Readers!

Feeds aren’t as important on day #1 as Permalinks. It’s still worth giving them some thought, so here goes. To manage your feed options, you need to go to Reading Options.

readingoptions

There you will see the Feed options at the bottom of the page called ‘Syndicate Options’. At the beginning it is unlikely you will have any Feed Readers at all, so let’s keep it simple.

syndicate

‘Show the most recent number of posts’ allows you to select the number of posts that are available to feed readers such as Google Reader. Most people choose ten posts, like mine. Also, you can choose whether the feed readers display the entire post or just a short summary. Let’s look at the difference.

This how the post looks if you choose the summary:

shortpost

It trails off leaving the reader wondering whether to hit the title and go to the blog or not. Some will. Many won’t. It’s quite hard to do when your mouse is in the same hand as your hot dog!

And now the full text:
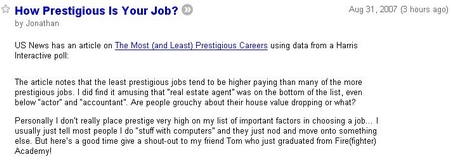
longpost

This is the entire post (albeit a short one!). Which one are you likely to read the entire posting?… Well…

And that’s why many bloggers use ‘Full Feed’, and many readers prefer that, too.

Next time, we’re going to look at Categories and how they work. That’s in Post #6 in the series! Happy Blogging!

WordPress Lesson 4: setting up your options (part 2)

Welcome back… In Lesson 3, we were looking at configuring some of the options before you really get into blogging. Today we’re going to look at ‘Updating Services and Privacy’ Options.

options

So, login, and navigate your way to “Options.” Then click on the ‘Writing’ tab. Can you see it?

Updating Services and Privacy

pinginfo

Updating Service: What’s an update service? What does it do? Why do I need it? An update service is a website that is set up to receive information about new posts that you or millions of other bloggers have recently made. They aggregate the information and notify websites that rely on your ‘ping’ to come and retrieve the latest postings for their own websites.

So for example, when you ping “Technorati” to let them know that you have just posted, when you check out your blog on Technorati, you’ll see that they have updated the postings list.

Why do you need it? Well, because the front end of many websites like Technorati is in fact a blog aggregator that collates and presents the posts for readers. Millions of people check sites like Technorati to find information, posts and new blogs on areas of interest to them.

Using a ping service like this can help you attract readers. Obviously, if you are just starting out, perhaps you don’t want to many people reading your blog, perhaps you can simply remove even the default ping service in the box. If this isn’t a problem, you may wish to add other services as well. You can just copy and paste this code into the ‘update services’ box.

If you are interested in adding more services or find out more information about Ping Services, check the WordPress site.

You’ll note that there is just one, but you can add more. These are the ping services I currently use on one of my blogs.

http://api.feedster.com/ping
http://api.moreover.com/ping
http://api.my.yahoo.com/rss/ping
http://www.blogdigger.com/RPC2
http://mod-pubsub.org/kn_apps/blogchatt
http://www.mod-pubsub.org/kn_apps/blogchatter/ping.php
http://www.newsisfree.com/xmlrpctest.php
http://ping.blo.gs/
http://ping.feedburner.com
http://ping.rootblog.com/rpc.php
http://ping.syndic8.com/xmlrpc.php
http://pingoat.com/goat/RPC2
http://rpc.icerocket.com:10080/
http://rpc.pingomatic.com/
http://rpc.technorati.com/rpc/ping
http://rpc.weblogs.com/RPC2
http://www.weblogues.com/RPC/
http://www.blogshares.com/rpc.php
http://xping.pubsub.com/ping/

Privacy Options are exactly as they say. But this is a feature you may have set wrongly when you started your blog. You can simply click on Privacy and choose the appropriate setting.

privacy

I’ve selected the first of the options, but if you don’t want your blog to be searched then choose the second option. Of course, that may make it difficult for new visitors to find your blog!

Part 4 will look at permalinks. It’s important to have an idea how to set those.

If you’re too busy, why don’t you sign up for my feed via RSS or Email, so you don’t have to keep checking the blog for the next part!

WordPress Lesson 3: setting up your options (part 1)

Continuing my series on WordPress for Beginners, Lesson 3 is going to focus on setting up your options. There are a number of options that need to be set up before you really beginning blogging. I’ll deal with three that you need to change and explain what they are, why you should care about them, and how to set them. Other bloggers may have different tips for you, but I think these steps should help get you started!

So to modify your options in WordPress, you need to do into Admin as before. Login and you will see the dashboard, now look along the row of commands until you see the words “Options”. Click and you’re there.

options

You’ll now see the commands listed below: General, Writing, Reading, Discussion, Privacy, Permalinks and Miscellaneous… You can click through the other commands later. But first, let’s get set up.

Setting Your Blog Title, Tagline, and Membership

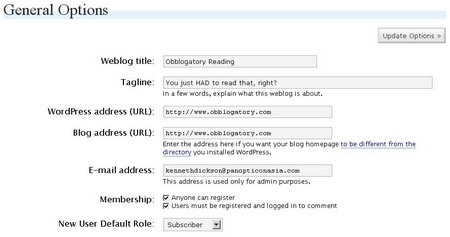
Blog Title: When you were setting up your blog, perhaps you chose your title carefully, perhaps you didn’t. Either way, you may wish to change that. To do that, we’re going to open the ‘General’ tab on the top left. See it! Right under Dashboard in white. Clicking on this will take you to the following page.

generaloptions

Tagline: You can simply change the title of your blog in ‘Weblog title’ and hit return. So try that! Most people don’t know how to change the Tagline (the Tagline is the line of text that sits under your Weblog Title usually), but this is where you can change it.

Membership: I don’t recommend beginners screwing with the next two options WordPress address or Blog address. So LEAVE them alone, unless you KNOW you have to change those.

Just below your E-mail address is a ‘Membership’ options. On this blog, I’ve allowed anyone to register to leave comments, and Users must be logged in to leave comments. You can of course change both of these. If you don’t want anyone else to register, then unclick ‘Anyone can register’. If you don’t want unregistered people to comment, then check the next one as I have. I’ll post later about commenting, if you’re still confused.

Don’t change the Default Role for new users. Subscriber is the lowest level role, and the safest.

Next in Lesson #4, we’re going to be looking at ‘updating service’… See you in a few days.

If you’re too busy, why don’t you sign up for my feed via RSS or Email, so you don’t have to keep checking the blog for the next part!