I spent most of the typhoon day today, apart from a small outage of power in the afternoon, working on small project for one of my clients at AgentsChat.com.
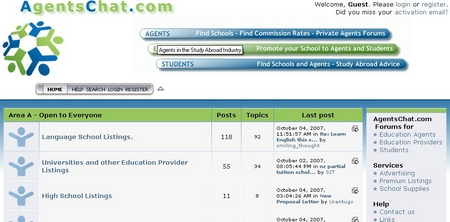
If you look closely, you’ll see that the area at the top, the header image has now got clickable areas with each clickable area linked to one of the categories of forums below. While clickable areas like that is hardly new, it did occur to me that making your header image clickable might be a good way to add extra navigation to your blog, and with clickable areas and tooltips showing information about each link, you get an extra chance to reach your visitors, and direct them to different places in your blog.
How do you do it?
Well, you need several things to make it work successfully. You need your header image, of course, or indeed any large graphic you plan to use on your frontpage. You will need to figure out the coordinates of your clickable areas. And you’ll need to find the place in your template to insert the code.
Tools
I actually found that OpenOffice 2.3 when in HTML mode has a tool to generate the code needed. So download it and install it. It’s free and good quality.
Step 1: Select HTML Document to create a new document, then give it a name. You won’t really use the document, just the code that it creates.
Step 2: Insert the image that you want to make clickable, ie. your header, on the Insert >>> Image >>> from file option.
Step 3: Then place your cursor over the image, and right click as in the image below:
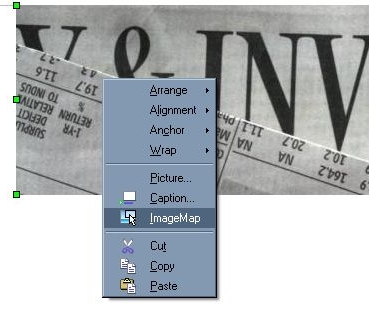
Step 4: You’ll see the ImageMap option. Click it.
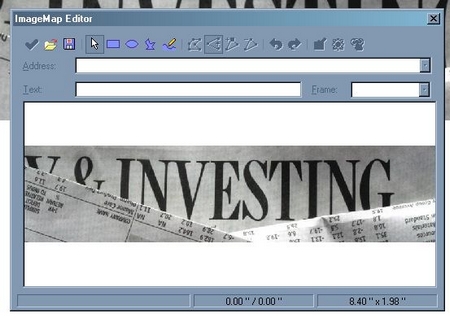
Step 5: The image map editor opens and looks like that image just above.
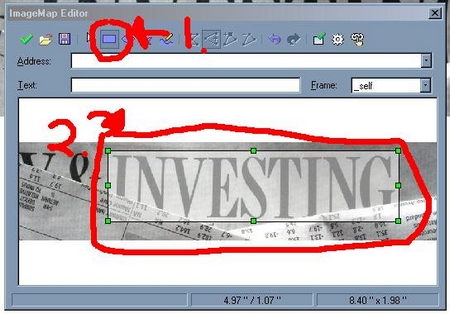
Step 6: Then click on the rectangle (or any of the other set shapes), then click and drag the cursor over the area of the image you want to make clickable. You can see the large box with handles highlighting the word ‘Investing’.
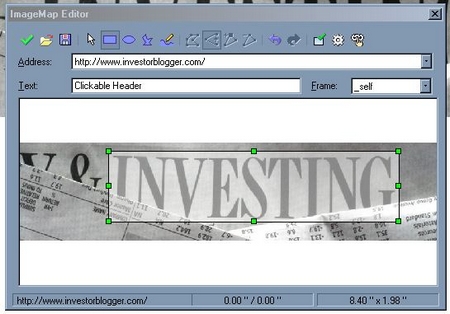
Step 7: After Step 6, just enter the URL you want to use and the text you want to show. The Frame option is set as ‘_self’, so it just opens in the same frame.
Step 8: You’ll need to save the document in ImageMap Editor. So save it. Then open it with the text editor. You’ll need the coordinates that the document gives you. In my case, I got the following information:
rectangle (171,15) (733,152) https://www.investorblogger.com/
Step 9: Then I found the following code, and I replaced the numbers you see below. Copy the text and edit the numbers. I added the URL for the website after the href command. I also found the location of the header image and pasted that in after the img src command.
<MAP NAME=”map”>
<AREA SHAPE=RECT COORDS=”171,15,733,152” href=”https://www.investorblogger.com/” TARGET=”_self” title=”InvestorBlogger: Taking you on the road to wealth!“></MAP><img src=”https://www.investorblogger.com/wp-content/uploads/2007/07/cropped-729163_69445788.jpg” border=0 alt=”” usemap=”#map”/>
*Don’t forget to set border image to 0, otherwise you might get a border around your image that you won’t want!
Step 10: Login, find the theme editor, and edit the file for the header. Find the code for displaying the image file or the location in the header file where you want to put the code. Paste it in there! And viola!

And that’s it! I’ve now got an image header with a completely different them, and a clickable header image! Tool tips included!
Good luck on changing yours! I had fun with mine, but it took a long time!